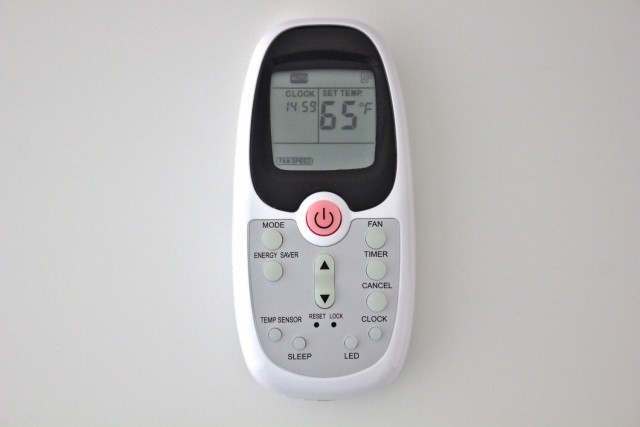
Last month, I purchased a 6000 BTU Midea window air conditioner (branded Arctic King WWK+06CR5) and thought it would be convenient if I could control it remotely. Doing so would involve decoding the remote’s IR signals; for this, I used a USB Infrared Toy and the PyIrToy Python library. Control signals for other Midea air conditioners have previously been decoded, providing a starting point. Although the signals transmitted by my air conditioner’s R09B/BGCE remote are similar to these previous remotes, they are also sufficiently different such that the actual data transmitted shares little in common. The signal is transmitted on a 38 kHz carrier, with a time base, T, of 21 carrier cycles, approximately 1.1 ms. Each bit consists of the IR transmitter off for 1T followed by it turned on for either 1T for 0 or 3T for 1. Each frame consists of a start pulse, six bytes of data, a middle pulse, and then the inverse of the six data bytes. The start pulse consists of the transmitter off for 8T and then on for 8T; the middle pulse consists of the transmitter off for 1T, on for 9.5T, off for 8T, and then on for 8T.
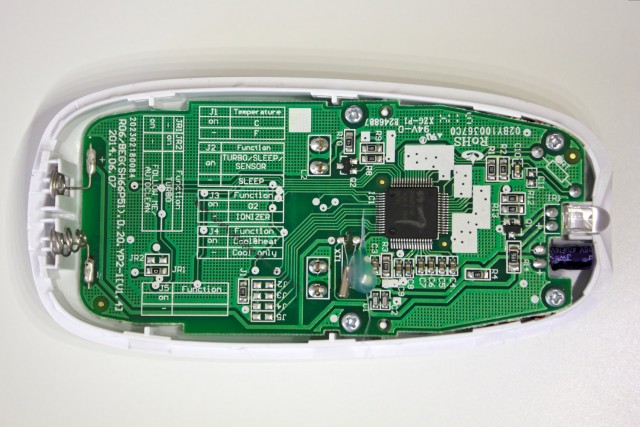
With the exception of the commands to toggle the energy saver feature and the front panel lights, all of the commands encode a full system state instead of just a single command, ensuring the remote stays in sync with the air conditioner. This state is encoded in five bytes containing information on the power state, sleep state, system mode, fan speed, set temperature, and the remote temperature sensor reading. The final byte is some sort of checksum, which I have not been able to figure out. The remote is based around a 4-bit microcontroller with 64 bytes of RAM, a Sino Wealth SH66P51A, so the checksum calculation must be something simple. Based on its behavior to changing input, it seems to involve It turns out that the bit order of the data needs to be reversed for the checksum calculation. The checksum can be calculated by reversing the bit order of the five data bytes; adding them, truncating the result to 8 bits, and subtracting the result from 28; and reversing the bit order of the subtracted result. Below is a Python function to do the checksum calculation.XOR operations, but it does not always behave like a simple XOR. As I haven’t been able to figure out the functional form of the checksum calculation, I can only send commands that I have recorded from the remote. This isn’t too much of an issue as I recorded all of the possible commands except for those involving the remote temperature sensor feature (and the timer since I didn’t care about it). Recording all temperature sensor commands would be very difficult as it only transmits once every three minutes and one needs to get the sensor to report all values. I was hoping to emulate the remote’s temperature sensor using a higher quality sensor, but, alas, I can’t without the functional form of the checksum.
def calc_checksum(bytes):
    # Reverse bits for each bytes
    bit_reversal = []
    for i in bytes:
        bit_reversal.append(int('{:08b}'.format(i)[::-1], 2))
    # Calculate checksum
    checksum = 2**8 - sum(bit_reversal) % 2**8
    # Return bits to original order
    return int('{:08b}'.format(checksum)[::-1], 2)
Detailed information on the individual data bytes, values recorded from the remote, and Python code for emulating the remote with a USB Infrared Toy is available here. If anyone figures out the checksum calculation, please let me know.
Edit 2016-04-23: Tim Chang figured out the checksum calculation and let me know via email. I updated the post to include the checksum calculation.
Edit 2016-08-17: Fixed description of middle pulse.


The inside of the device is very pretty. It obviously has many different functions that can be used. Now just exactly where is the operating instructions for it???
There’s an archive at the end of the post that contains proof of concept Python code for sending commands. As I never figured out the checksum calculation, it’s somewhat incomplete.
“With the exception of the commands to toggle the energy saver feature and the front panel lights, all of the commands encode a full system state instead of just a single command, ensuring the remote stays in sync with the air conditioner.”
THANK YOU for confirming this. I was walking through Walmart last night and was surprised how robust this remote might be, and was hoping that it fit into this category. My Frigidaire doesn’t, which makes integrating it into an HA system difficult to say the least. I need to buy a second unit for other reasons – going to go for an Arctic King thanks to your work. :)
Hi,
In your text you say that “The start pulse consists of the transmitter off for 8T and then on for 8T; the middle pulse consists of the transmitter off for 1T, on for 9.5T, off for 4T, and then on for 4T.” But in your code (encoding.py) the middle pulse is coded as off for 1T, on for 9.5T, and then off for 8T and on for 8T. Which is correct, your explanation or code?
The code was correct, and the description was incorrect. I just fixed the post.
Please tell me the resistor value “RT”?
The upper right corner in the photo.
If you can picture card with the back side of it.
How do you function “Follow Me”, when using the remote?
I don’t know what the value of RT is; I don’t have any photos of the other side of the PCB. I do not know what the “follow me” label on the PCB refers to.
“RT” – This is a temperature sensor.
This means that actual temperature data can be sent from where the remote control is located. “follow me”
In your remote control, it will be present (soldered on the back of the board). I wonder what kind of sensor it is?
Given the 4-bit microcontroller, the sensor is obviously something cheap. Based on the silkscreen, I’d guess a thermistor. As the remote’s case is held together with plastic clips, I don’t want to risk damaging them by opening it again.
First off, I wanted to say thank you for posting this. I also have the same air conditioning unit, and I stumbled across this post when I was trying to see if I could use my IRDroid to control this unit.
I wanted to make a version very similar to this that uses Linux’s built-in IR IR transmit/receive libraries rather than Python, but I ran into some difficulty when I tried to first read some of the signals transmitted by the remote itself.
Can I ask how you did this? I saw the post you linked where someone else decoded their Midea AC unit’s remote using an oscope and a logic analyzer — did you do the same for yours? When I tried to read the IR signals from the remote using just mode2 (https://linux.die.net/man/1/mode2), I only was able to read the signal for the power on button, the fan button, and the mode button, but none of the other buttons would report anything. I thought maybe there was an issue with my IR receiver, but when I tested it with a different device’s remote (for a TV tuner box), it worked fine and was able to receive a scancode for every button.
As mentioned at the beginning of the post, I used a Dangerous Prototypes USB Infrared Toy to receive signals from the remote using the PyIrToy Python library. It’s been almost seven years since I worked on this, but I don’t remember having any issues receiving the signals. Sorry I can’t be of more help.